Tuesday, December 18, 2012

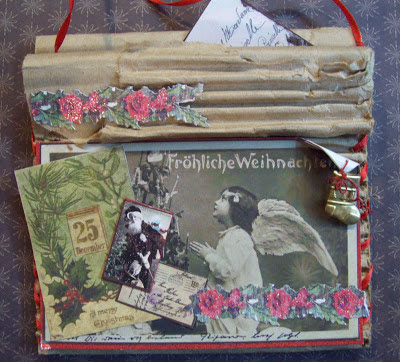
Christmas Pockets

I decided to create some Christmas pockets out of corrugated cardboard using images from Mrs. O'Leary's.  I simply folded the cardboard three different ways, making sure to create a pocket. I then added images and embellishments.  The one above has German art glass and has a vintage scroll peaking out of the top.

I folded this one and then stitched both sides with a ribbon.

On this one, the picture flips up, as it is attached to the top flap, to reveal the gift inside.  I had fun creating these Christmas pockets, using all of my favorite things.  They would be perfect for gift cards or gift certificates, another of my favorite things!

Tuesday, December 11, 2012

12 by 12 Christmas

Time for some Christmas stamples for Mrs. O'Leary's
I am still loving the 12 by 12 format...
so here are a few using Artful Illusion stamps.


Santa hanging out with my favorite crow!

Love the Lost and Found Christmas line of
papers by My Mind's Eye ...lovin' layering too!

Wednesday, December 5, 2012

altered cabinet cards

I love to alter cabinet cards and use vintage images for collage!
She is a "Queen of Hearts" for my Love Book (to be posted about soon). 
I scalloped the edges and "pinked her up" with lots of doodads and trims.


I made this during a class taught by my friend Jo McQueen.  She provided the picture taken from a cabinet card and the tea cup.  I cut around the little girl, added wings, a nest and an egg.


This was made with tags, papers, stamps,
ephemera, and images from Mrs. O'Leary's.


I borrowed this idea from the book Vintage Collage Works
I used the back of a thick canvas and filled it just like a shadow box. 
This was also an art junk swap challenge from my Altered Artists group.


Here is this year's Christmas ornament for my Altered Artists group.  I found the glittery cage at WalMart for a couple dollars and knew I had to create a little fairy for it!  I added some sparkly pink eggs from Michael's and copper tinsel for a nest.

Tuesday, November 13, 2012

masks made of metal

Here is my latest adventure in mask making with 7th graders. I found these
on Pinterest and had to try them!  We used 36 gauge aluminum and colored
sharpies. Students double matted them with black and marbled
construction paper by School Smart.


Students drew out their mask onto the metal with a skinny stick,
then used a Popsicle stick to push some parts back and
bring some forward to create some dimension.


I used cardboard to create small easels,
which are perfect for the finished 9 by 9 inch pieces!

Friday, November 2, 2012

los dias de los muertos


November 1st and 2nd are the Days of the Dead.
This is the first year I have had the opportunity to celebrate this in my artroom.  I bought a short video from Teacher's Discovery which shows the celebration from two teenagers' points of view.  It includes all of the preparation for the alters, and the celebrations for All Saint's Day and The Day of the Dead.

I found Mr. Bones AKA Senior Huesos on an after-Halloween clearance and decided he would be perfect for the Day of the Dead alter.  I used Day of the Dead fabric as a scarf.  I bought him a hat for his journey, and added more fabric, fruits, flowers, artwork, grasshoppers, candles and sugar skulls to complete the alter.

My friend Ruth made these sugar skulls with her students and gifted them to me.  I used the same molds and tried to make them out of paper clay and decorate with marker... they turned out all right, I like the real sugar skulls better!


Students could color a skull color sheet and add to the designs.  They colored them with highlighters and matted them to a bright paper for a festive effect!

I cut some skull stamps from easy-cut.  We stamped them using markers or a black ink pad and then adding decorations with marker to make little cards.


These are a couple of cute skull masks made of paper plates!

I love the effect of this cut out skull matted onto modeled construction paper!
Overall, it was a pretty festive day in the artroom.
Students of all ethnic backgrounds had fun and learned a lot! 


Wednesday, October 24, 2012

Spooky Story Time!

It's that time of year again, boys and girls, when this ghoulish art girl gets to create spooky book art!  Here are a few of my haunting books that have come out to play just in time for trick or treating!

This is a haunted house "remains of the day" book.  I have spent a few seasons on this gathering together just the right spooky stuff for each page spread...
...I think I am finally finished????


This is an 8 by 8" cardboard book.  Each page was painted and then collaged on with halloweeness I have been collecting.  It was fun to load up the pages and add a bit of writing here and there. 


This is a 4 by 4" chunky book created with my Altered Artists Group. 
We each made a page and they were bound together to create a fun little
(yet chunky) scary story.
The page on the left is mine, the right is by Yolanda.

The page on the left is by Bonnie, the right is by Wendy.

The page on the left is by Joyce, the right is by Jo.

This is my latest adventure in creating an altered halloween book.  I found a black covered book at the dollar store, a little frame in the dollar bins at Michael's and a lenticular portrait sticker to complete the cover.  I then got to "play" on the inside with black paint, stencils, and stamps.  I love how you can still see the writing through the paint, creating a truly haunting look to the story!


You can see more halloween themed books here.


12 by 12 squared


"31"
Stamps, papers, embellishments
I love to work in 12 by 12 dimensions.  It is a nice presentation size and a fun challenge!  These are a few "stamples" I have made for Mrs. O'Leary's in Wichita, KS.  I used the store's line of Artful Illusions stamps.  I also layered fun papers and embellishments, which are also available at the store.

"Age of Industry 123..."
Stamps, papers, gears, clock parts

"Haunted Visions"
Stamps, papers, embellishments

You can see more 12 by 12 art here.

Thursday, October 18, 2012

A new perspective...

Throughout the year, 7th and 8th grade students work on projects dealing with perspective.  These assignments start simple in first semester 7th grade and build on previous knowledge in following semesters.  Here are just a few ideas using one, two, and multi-point perspective that my students have explored!

8th Grade Two-Point Perspective City in Sharpie.

7th Grade Bird's Eye View One-Point Perspective City in Pencil.

7th Grade One-Point Perspective Initials in Colored Pencil and Marker.

7th Grade Surrealist Room in One-Point Perspective with Marker.

8th Grade Two-Point Perspective City in Pencil.

8th Grade Multi-Point Perspective Surrealist Space with Creature in Sharpie.
See more of these here.

8th Grade Two-Point Perspective City in Sharpie.

7th Grade One-Point Perspective Initials in Marker.

8th Grade Multi-Point Perspective Surrealist Space with Creature in Sharpie.
See more of these here.

7th Grade Surrealist Room in One-Point Perspective with Colored Pencil.


7th Grade One-Point Perspective Room in Colored Pencil.

7th Grade One-Point Perspective Room in Pencil.

7th Grade One-Point Perspective Room with Sharpie and Collage.
See more of these here.