Wednesday, December 25, 2013

Creating for Christmas

This little Christmas kitty was made as a stample
for Mrs. O'Leary's this year.  Just had enough time to
make a few using new holiday papers and Artful Illusion stamps...

Santa Poe and his Christmas raven came to visit this year...

Here's a dimensional tree popped off a canvas made
with new fun Christmas papers and embellishments.

Kitty can be pulled up or left lower for a Christmas surprise!

Wishing you all a creative Christmas!
 

Sneaky Sneakers

Awe...an oldie but a goodie...Shoe Art!  Students love drawing shoes because it is super easy (although seemingly challenging at first), they have awesome results, and they get to show off some of their personal style!  This year, thanks to getting lots of ideas from Pinterest, students got to choose the way to finish their shoe and design a background to complete the work.  I love how these turned out!


Fall Leaves

During the fall semester, as students finish work early,
I have several fall leaf projects for them to choose from. 
These are just a few.
 
Half inch grid paper, stencil, and textures.
 
Leaf rubber stamps in black ink on kraft paper, drawn over with chalk pastels.

Stenciled leaves outlined in sharpie with line in the negative space.

Stenciled leaves with marker textures and echo lines.

Crayon drawn leaves and watercolor with salt textures.

One inch grid, stencil, textures, and colored pencil shading.

Rubber stamped leaves using markers in a radial symmetrical design.
 
Stenciled leaves, glue/glitter outline, watercolor, marker echo lines.

See more of these and other autumn art here.
 
Students also enjoy creating tree art this time of year.
You can see more tree art here and here and here.


PS...thanks to Pinterest and the bloggers I follow for some of these ideas!
 

Sunday, November 10, 2013

Poe fo sho


Recently, I had the chance to make stamples 
with the new Edgar Allen Poe stamps
from Artful Illusions for Mrs. O'Leary's.

I enjoyed layering the Poe stamps with others in the stamp
line. I had fun playing with scale, color, texture, and paper.

You can see more stamples for Mrs. O'Leary's
here and here.


Day of the Dead Skulls

For Day of the Dead this year,
I decided to design some fun skulls
to add to our alter at school.
 
I bought three plastic skulls from the Dollar Tree,
coated them with three coats of Gesso and used
Sharpie and Bic permanent markers to embellish.

It was fun coming up with the different
color schemes and lines, shapes,
and patterns to design each skull.

Each ended up with its own mood and persona. 
I worked on these during class times, and 
students loved to watch as they developed.

You can see more on our Day of the Dead Alter here.

Friday, September 6, 2013

Something to Crow About!

Recently, I got to play art with two of my favorite art teacher friends Linda and Shawny.  We found fun crows at the dollar store and decided to alter them.  We all started with a steampunk theme, but each of them turned out completely different, but totally cute, of course! 
This is Linda's crow.  She attached swirls of rusted wire and copper toned gears with rusted nails.  The crow's body is made of styrofoam so it is easy to push into for attaching.  I love how the rust color looks with the black feathers of the crow! And that head piece is amazing!
This is my crow I made for my art group a while ago.  He wanted to get in on the photo shoot, even though he wasn't made at this art party!  I used black and white papers to embellish and attached him to a box which holds a secret nest inside! (shhh...)

This is Shawny's crow.  She added flowers, gears, rusted nails and wires.  I love how she wrapped the wire around the beak and feet.  She gave a feminine touch to her crow with the flowers and a feathery head piece. 
This is my crow created at the party.  I decided to use pink rickrack and feathers.  I used silver gears and black nails.  I also added a silver crown, a steampunk sash and black clock hands. He is definitely ready for an art party!

Psst!...Are you a crow lover like me?
You can see more crow art here and here!

Monday, September 2, 2013

Stitchies

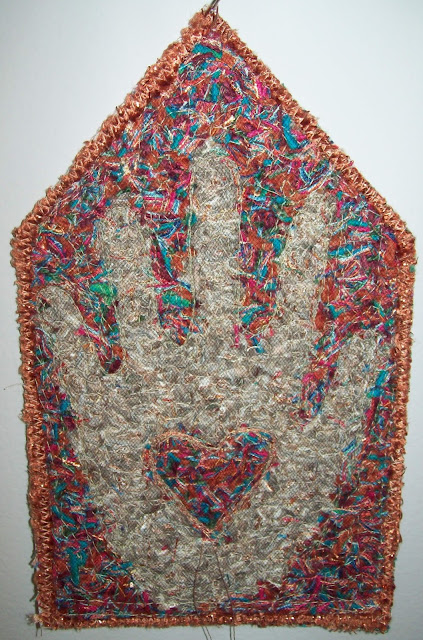
This summer I had the awesome opportunity to attend an art teacher camp sponsored by KAEA.  We were allowed to choose from a few options including oil pastels, sculpture, or fiber arts.  I chose fiber arts.  This workshop was taught by Marilyn from the Fiber Studio in Wichita, KS.  I learned a lot and was able to finish five pieces in two days!

We started out with a piece of heavy fusible interfacing that was about 6 by 9 inches.  We then began to cut up bits of various weights and textures of fibers to create a composition.
We then added a piece of black tulle over the top of the fiber pieces.  With a warm ironing, the pieces were loosely attached so that we could begin stitching through the layers using decorative threads.

The stitching was done on the sewing machine with a special embroidery foot and lowered or covered feed dogs.  After stitching through the layers, we could add more decorative fibers on top and/or a finished edging.
I had tons of fun coming up with a variety of different composition possibilities and playing with all of the fibers!  I am very glad I was able to learn a new skill and another artful use for my sewing machine!

Friday, August 30, 2013

Tree for all Seasons


For my Altered Artists Group, one of our latest challenges was to  separate a canvas into fourths and rotate "round robin style" with three other members. We each picked a theme for our canvases.  My theme was a seasonal tree.
After dividing my canvas and drawing a tree silhouette, I decided to finish the winter section.  I painted the tree brown and then over painted with Tim Holtz white distress paint. The paint crackled just a bit to give the tree a "frozen" look.  I then painted the background white, outlined in pencil, drew layers in the snow, and embellished with snowflake buttons.
Debbie decided to do the spring portion of the tree.  She painted the sky a spring blue and the tree deep brown, scratching in some texture. She then added some punched leaves and sequined flowers. 
The summer portion was finished by Andi. She used paint blending sticks to create a warm summer sky and dimensionally shaded tree.  She added some texture to the tree with sequin scrim, and stamped textured green leaves.
Nancy took on the challenge of the autumn portion of the tree.  She painted a cool blue sky and textured the ground with paint.  She then collaged the bark of the tree with decorative paper scraps to create some actual texture.  She finished by adding punched out fallen leaves.


I just love how this turned out.  
Each artist created the perfect effect for their season.  
It is one of my favorite group collabortions!